I know what’s sitting behind your garage door right now.
Boxes stacked on boxes. Tools you can’t find when you need them. That bike you swore you’d ride more often buried under last year’s holiday decorations.
Your garage turned into a dumping ground. And every time you open that door, you feel it.
Here’s the thing: you don’t need a complete renovation or expensive storage systems to fix this. You just need a plan that actually works.
This guide shows you how to organize your garage livpristhouse style. We break the whole process into steps you can tackle one at a time. No overwhelm. No burnout.
An organized garage gives you back time. You’ll stop hunting for things. You’ll park inside again (imagine that). And you might even rediscover space for the workshop or gym you’ve been wanting.
I’ve helped people transform garages that looked hopeless. The method works because it’s simple and it meets you where you are right now.
You can do this. Let’s get started.
Step 1: The Foundation – A Ruthless Decluttering Process
You cannot organize clutter.
I don’t care what storage system you buy or how many bins you stack. If you’re trying to organize junk, you’re wasting your time.
The first step in learning how to organize your garage Livpristhouse style is simple. Get rid of stuff.
Pull everything out. Yes, everything.
I know it sounds extreme. Your garage probably looks manageable right now (or at least not completely hopeless). But you need to see what you’re actually working with. A clean slate shows you the real space you have.
Set up four distinct areas. I use old tarps or mark sections of the driveway with tape.
Label them KEEP, DONATE/SELL, TRASH, and RELOCATE.
That last one matters more than you think. Half the stuff in your garage probably belongs in your house or shed. Moving it now saves you from organizing things that shouldn’t even be there.
Now comes the hard part. Making decisions.
Here’s my rule. If you haven’t used it in a year, it goes. Not “might use it someday.” Not “could be handy just in case.” Actually used it in the past twelve months.
Some people say this is too harsh. They argue you might need that extra garden hose or those paint cans from 2019. Maybe for a special project down the road.
But here’s what really happens. Those items sit there for another five years while you work around them. They take up space you could use for things you actually need.
As you sort your KEEP pile, group items immediately. Automotive stuff goes together. Gardening tools in one spot. Sports equipment in another. Holiday decorations separate from everything else.
This saves you from sorting twice. You’re already touching each item, so categorize it now.
Pro tip: Take photos of your empty garage before you start putting things back. You’ll want to remember what that clean space looked like.
Step 2: Create Your Zones – A Blueprint for Functionality
Stop right there.
I know you want to run out and buy a bunch of shelving units and storage bins. But that’s exactly how you end up with a garage that still doesn’t work.
Here’s what I do instead.
I map out zones before I spend a single dollar.
Think of your garage like your kitchen (stay with me here). You don’t keep your coffee maker in the pantry or your pots next to the fridge. Everything has a place based on how you actually use it.
Your garage needs the same treatment.
The zoning concept is simple. You assign each area of your garage a specific job based on two things: how often you need the stuff and what type of stuff it is.
Some people say just stack everything neatly and call it a day. But that’s lazy thinking. You’ll end up moving ten boxes every time you need your drill.
Here’s how I break down my zones.
High-Frequency Zone goes right by the door that leads into your house. This is where I keep shoes, recycling bins, and pet supplies. Stuff I touch daily or multiple times a week. It needs to be grab-and-go easy.
Workshop Zone gets a dedicated wall space. I set up a workbench here with a pegboard above it for tools and add task lighting so I can actually see what I’m doing. (Nothing worse than trying to fix something in dim garage light.)
Long-Term Storage Zone is for seasonal items. Holiday decorations, winter gear in summer, camping equipment you use twice a year. This goes on high shelves or overhead racks. Places that are harder to reach but keep floor space clear.
Bulky Items Zone runs along one wall. Lawnmower, bikes, large equipment. These things aren’t going on shelves anyway, so give them their own real estate.
Now, will everyone at livpristhouse agree with my exact setup? Probably not. But the principle holds.
When you learn how to organize your garage livpristhouse style, you’re thinking about function first. Not just buying storage and hoping it works out.
Map your zones on paper first. Walk through your daily routines and be honest about what you actually use.
Then you can shop smart.
Step 3: Go Vertical – Smart Storage Solutions That Maximize Space
Last summer I stood in my garage staring at a mountain of stuff on the floor.
Bikes leaning against paint cans. Tools scattered across every surface. Boxes stacked so high I was afraid they’d topple over and bury me alive.
I realized something obvious. The floor was the problem.
Not because I had too much stuff (okay, maybe a little). But because I was only using about 20% of my actual storage space.
Your walls and ceiling? That’s where the magic happens when you learn how to organize your garage livpristhouse style.
Here’s what I did.
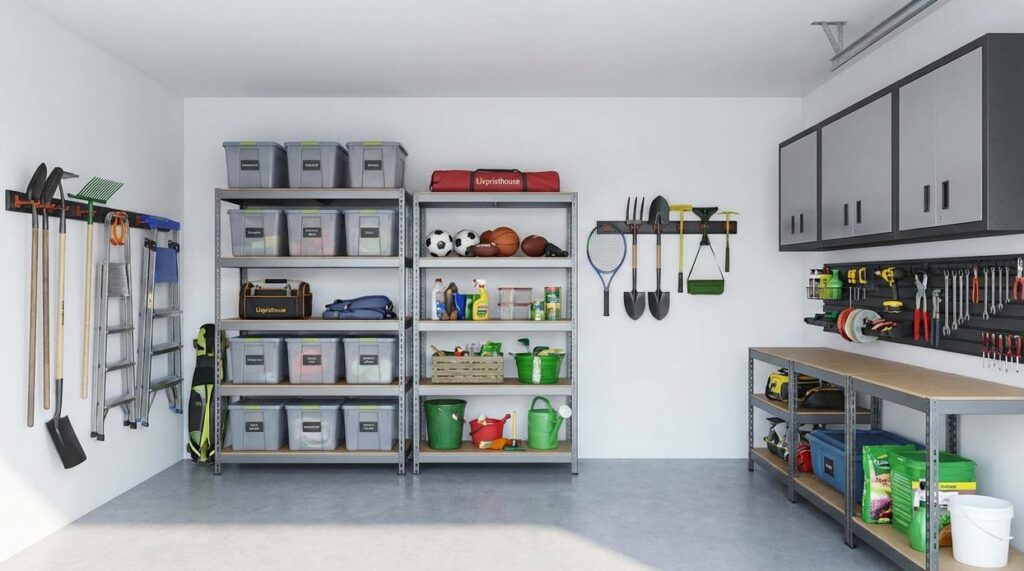
Heavy-Duty Shelving
I started with metal shelving units along one wall. The open design lets me see everything at a glance.
Some people swear by cabinets. They hide the mess and make everything look clean. But I found them frustrating. You can’t adjust the shelves easily and you forget what’s inside.
Metal or industrial plastic shelving wins for me. You can move the shelves up or down as your needs change. Plus they hold serious weight without sagging. We explore this concept further in House Conservation Tricks Livpristhouse.
Wall-Mounted Systems
This is where things got interesting.
I installed a pegboard above my workbench. Every screwdriver and wrench now has a home. I can grab what I need in seconds instead of digging through drawers.
For heavier gear, I went with a track rail system. My bike hangs on the wall now (not leaning against my car). Same with my ladder and garden tools. The specialized hooks make it easy.
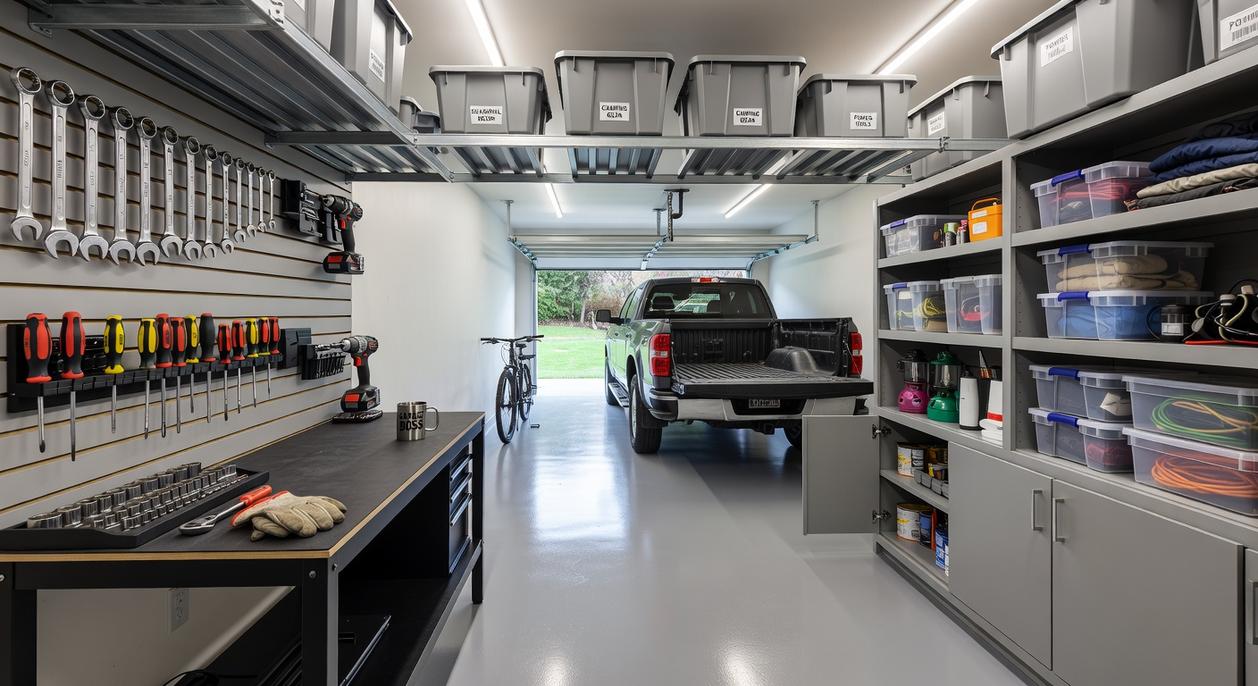
Overhead Ceiling Racks
The ceiling was my secret weapon.
I mounted overhead racks in the dead space above my car. Now my holiday decorations live up there. Camping gear too. All the stuff I need twice a year but don’t want taking up prime real estate.
Just remember these are for bulky but lightweight items. Don’t try hanging your anvil collection up there.
Container Strategy
Here’s what nobody tells you about bins.
Get clear ones. Always. I wasted months looking for things in opaque containers.
Buy the same size so they stack properly. And get lids that actually lock. The snap-on kind that pop off when you breathe on them? Useless.
Label every bin on at least two sides. I use a label maker but a thick marker works fine.
The result? I can park both cars in my garage now. And I can find my camping stove without a search party.
Step 4: The Finishing Touches – Everyday Optimization Hacks
You’ve done the hard work.
Your garage has zones. You’ve got shelves and bins. Everything has a home.
But here’s where most people stop. And honestly, that’s a mistake.
The difference between a garage that stays organized and one that turns back into chaos in three months? These small details.
I’m talking about the stuff nobody mentions in those before-and-after photos. The tweaks that make how to organize your garage livpristhouse actually stick.
Start with storage hacks that solve real problems.
Magnetic strips on the wall for drill bits and small tools. I can’t tell you how many hours I’ve wasted digging through drawers for a single hex key. Stick a magnetic strip up and you’ll never lose those tiny metal pieces again.
A ball claw mounted in the corner handles sports balls without eating up floor space. Bungee cords or old seatbelts (yeah, the ones from that junker you finally got rid of) work great for securing loose items on shelves.
These aren’t fancy solutions. They just work.
Here’s what I think matters more than people realize.
A dedicated workspace. Even if it’s just a small wall-mounted folding workbench.
You don’t need a full workshop setup. But having ONE spot where you can actually work on a project without moving your car? That changes everything. The bench folds up when you’re done and you get your floor space back. Property Preservation Guide Livpristhouse builds on the same ideas we are discussing here.
Lighting makes a bigger difference than you’d expect.
Swap out those dim bulbs for bright LED shop lights. Your garage will feel completely different. Cleaner. More inviting. Like a space you actually want to use instead of avoid.
Same goes for the floor. Seal or paint that concrete. It looks better and it’s WAY easier to sweep up sawdust or wipe up oil drips.
Some people say this stuff is overkill. That a garage is just a garage.
I disagree. If you’re spending time out there, make it a space that doesn’t depress you every time you walk in.
The real secret? Maintenance.
Schedule 15 minutes once a month. Put stray items back in their zones. Sweep the floor. Check if anything needs adjusting.
That’s it. FIFTEEN MINUTES.
Most organization systems fail because people treat them like a one-and-done project. They’re not. They need a tiny bit of ongoing attention.
But if you’ve set everything up right with these house conservation tricks livpristhouse, that monthly reset takes almost no time.
Your garage stays functional. You stay sane.
Worth it.
Enjoy Your Newly Optimized Garage
You came here because your garage was a mess. Now you have a clear path forward.
The four-step process works because it’s simple. Declutter what you don’t need. Zone your space by function. Store vertically to maximize room. Optimize with the right systems.
A cluttered garage isn’t a permanent problem. It’s just a project you haven’t tackled yet.
This systematic approach takes something overwhelming and breaks it down into manageable pieces. You don’t need to transform everything in one day.
Here’s what you should do: Start this weekend by tackling just one section. Pick the area that bothers you most and apply these steps there first.
You’ll build momentum once you see results.
how to organize your garage livpristhouse gives you the blueprint. The rest is up to you.
Your garage can work for you instead of against you. You just need to take that first step.
 Founder & Creative Director
Kylor Dornhaven is the kind of writer who genuinely cannot publish something without checking it twice. Maybe three times. They came to home inspiration headlines through years of hands-on work rather than theory, which means the things they writes about — Home Inspiration Headlines, Interior Trends and Layout Ideas, Essential Living Concepts and Styles, among other areas — are things they has actually tested, questioned, and revised opinions on more than once.
That shows in the work. Kylor's pieces tend to go a level deeper than most. Not in a way that becomes unreadable, but in a way that makes you realize you'd been missing something important. They has a habit of finding the detail that everybody else glosses over and making it the center of the story — which sounds simple, but takes a rare combination of curiosity and patience to pull off consistently. The writing never feels rushed. It feels like someone who sat with the subject long enough to actually understand it.
Outside of specific topics, what Kylor cares about most is whether the reader walks away with something useful. Not impressed. Not entertained. Useful. That's a harder bar to clear than it sounds, and they clears it more often than not — which is why readers tend to remember Kylor's articles long after they've forgotten the headline.
Founder & Creative Director
Kylor Dornhaven is the kind of writer who genuinely cannot publish something without checking it twice. Maybe three times. They came to home inspiration headlines through years of hands-on work rather than theory, which means the things they writes about — Home Inspiration Headlines, Interior Trends and Layout Ideas, Essential Living Concepts and Styles, among other areas — are things they has actually tested, questioned, and revised opinions on more than once.
That shows in the work. Kylor's pieces tend to go a level deeper than most. Not in a way that becomes unreadable, but in a way that makes you realize you'd been missing something important. They has a habit of finding the detail that everybody else glosses over and making it the center of the story — which sounds simple, but takes a rare combination of curiosity and patience to pull off consistently. The writing never feels rushed. It feels like someone who sat with the subject long enough to actually understand it.
Outside of specific topics, what Kylor cares about most is whether the reader walks away with something useful. Not impressed. Not entertained. Useful. That's a harder bar to clear than it sounds, and they clears it more often than not — which is why readers tend to remember Kylor's articles long after they've forgotten the headline.